|
|
|
|
|
|
Ufosightingsdaily
|
|
British UFO Research Association
|
|
Beforeitsnews
|
|
David Icke
|
Paranormalresearchuk
|
NEW! Download UFO/MagField Detector
|
|
|
Welcome
|
Welcome to the UFO/MagField Detector App. help page.
The first thing you will notice is the change in the Apps name, from UFOObserver to UFO/MagField Detector.
This App enables you to take and store pictures/videos of UFO's/Unusual
Phenomena together with the Geo Location,Compass Direction,Camera
Elevation/Tilt, Magnetic Field Strength, Atmospheric Pressure and Temperature data then
display the location with image on a map and in Google StreetView.
|
|
|
NOTE: 1/ When you turn OFF the sounds from the SensorView Menu
there is a Slight DELAY before the sounds are stopped.
NOTE: 2/ As is common with ALL sensors in Android phones, if a particular sensor reading presists
even after moving the phone, THEN holing firmly, ROTATE the phone a couple of times in your
hand until sensor reading reads correctly.
|
Introduction
|
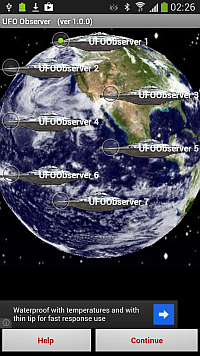
When the App begins there are 7 separate databases to chose from.
The default names are UFOObserverX, where X is from 1 to 7.
The names of each database can be changed
using the Config utility in the Map screen menu.
This enables you to have 7 separate Observation projects.
|
To Begin
|
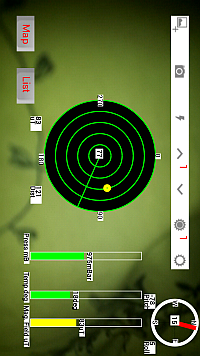
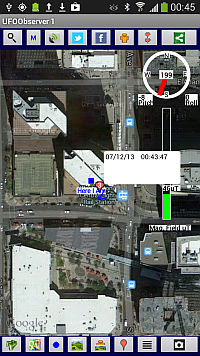
To begin, press Continue, accept the first Database or decline and select another
to display the second screen as shown above.
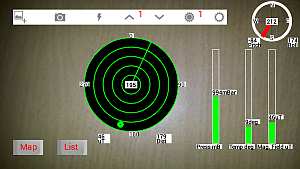
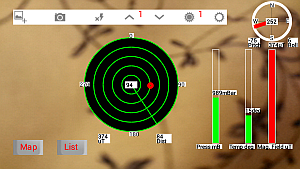
This is the SensorView Screen, which depicts a Radar that senses and displays the proximity
of a Magnetic Field.
You are at the center of the Radar with a 360 degree view around you (0 deg being straight ahead of you).
A Green Dot depicts a Normal Background Magnetic Field.
A Yellow Dot depicts the proximity of an unusually Elevated Magnetic Field (accompanied by a Warning Voice).
A Red Dot depicts the proximity of an highly unusual Elevated Magnetic Field (accompanied by an Alarm sound).
The closer the Dots are at the Center of the Radar, the closer the Magnetic Fild is to you.
NOTE: The Warning Sounds can be turned off, (there is a slight delay), from the Menu, amoungst other options.
|
Viewing Magnetic/Temperature And Pressure Graphs
|
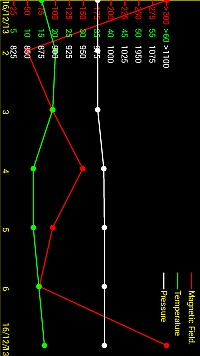
To view stored readings in graph form, press List button on the SensorView Screen then select Graphs.
|
|
|
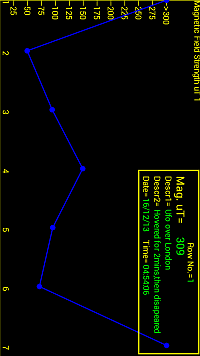
To display the contents of a point on the graph, touch that point, and the information
relating to the point will display in the Information Window, at the top right of the screen.
NOTE: This ONLY appies to the individual graphs, NOT to the ALL GRAPH display pictured on the left above.
|
|
Taking Pictures In MapView
|
To take pictures in MapView, press the Map button on the SensorView Screen to display MapView Screen, which depicts a Map and your position on it.
To take a picture/video press the Camera icon (the last button on the bottom row).
|
|
When the picture/video was saved it also stored Date,Time,Geo Location,Compass Direction,Camera
Elevation/Tilt, Magnetic Field Strength, Atmospheric Pressure and Temperature data. This can be viewed in one of two ways. One is to touch the picture,
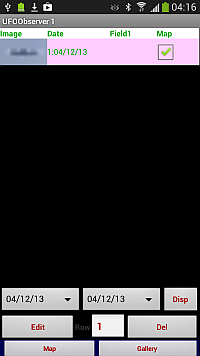
which will take you straight to the Edit Item screen. Two is when the picture is not displayed, to press the List button
(next to the Camera button) which takes you to the list screen. Touch the required row and press Edit.
|

|
|
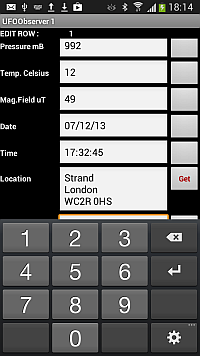
As you scroll through the screen there are boxes already automatically
filled in when the picture/video is taken. Fields 1 to 9 are available for you to
enter information. The contents of Field1 are diplayed on the thumbnail picture
on the Map screen. eg if you entered "UFO over central London" then this text will
appear on the image window for that pin. Fields 1 to 9 can be renamed by you using
the Config Utility in the Map screen menu.
|
Taking Pictures From The SensorView Screen
|
Pressing the SensorView button (first bottom button) replaces the Map with a view from the Camera.
Superimposed on the view are the Compass, Magnetic Fiield Strength (micro Teslas),Temperature (degees Celsius)
Atmospheric Pressure (milli Bars) and Camera Controls. (The Sensors can be removed/dispayed by seleting Sensors from the menu)
|
|
|
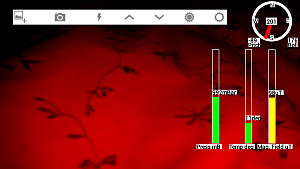
This view can be used to detect and take pictures of areas with
unusual Magnetic Field Strength/Temperature/Atmospheric Pressure values. The screen on the left shows
a normal background Magnetic Field Strength of 51 micro Teslas (background varies
from 30-60 micro Teslas). The picture on the right indiates an unusual value of
374 micro Teslas and hence is coloured red.
|
|
|
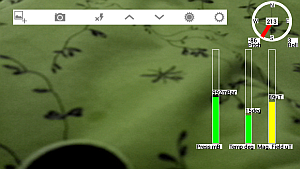
The first button on the control bar toggles between normal,red and green
Camera Views. The Red and Green at the moment act as filters but will soon be converted
to Infra-Red and Night Vision views. The Magnetic Field Strength in both is elevated but
not completely unusual and so are coloured Yellow.
Note that the Radar in thoe pictures has been turne OFF
by using the Menu selection for Radar.
|
The second button on the control bar takes a picture, and as before stores the image and all
the associated data. This will then return you to the Map screen displaying a new red pin. Touch the pin to display a thumbnail
of the picture taken if it is not already displayed.
|
The other buttons on the control bar are Flash On/Off, Zoom In, Zoom Out,
Increase Brightness and Decrease brightness.Turning on the Flash, resets the
brightness level to normal.
|
|
Displaying Pictures In Google StreetView/Maps
|
|
|
|
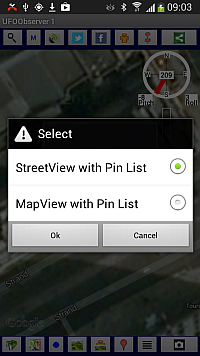
To display the Pictures in Street/Map Views press the 5th button on the bottom row,
then chooose between "StreetViewn with Pinlist" or "MapView with PinList". Selecting the
first choice will display the first screen below,and selecting the second choice displays the
second screen below.
|
|
|
|
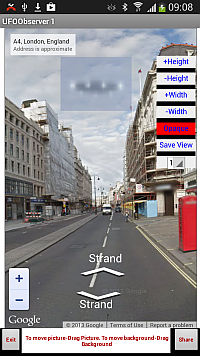
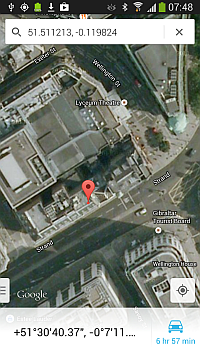
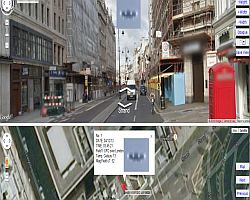
The first screen superimposes your picture on Googles SteeetView at the location it was taken. You can move/resize
the image and then Share it by pressing the Share button. You can select the pin to be viewed from the drop down
selection box.
|
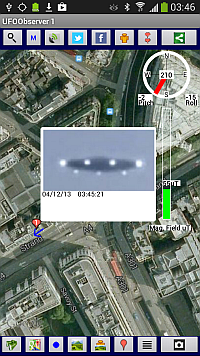
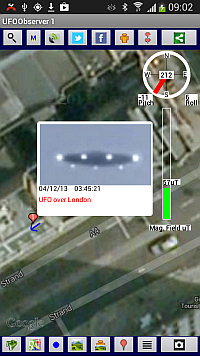
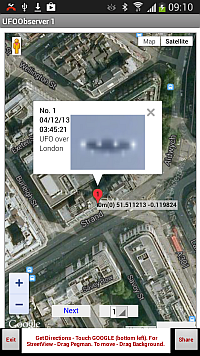
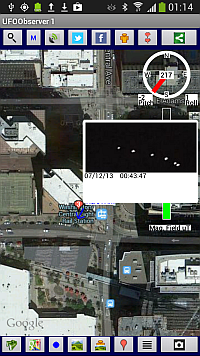
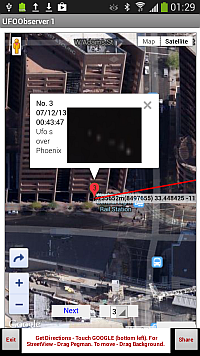
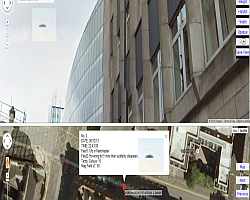
The second screen superimposes your picture on Googles MapView at the location it was taken.
displaying the image in a window with the contents on Field1 from the Edit function. I also displays the
distance rfom the previous picture and the total distance from the first picture taken (in brackets).
The latitude and longitude of the picture are also shown. It can also be shared by pressing the Share button.
Dragging the Yellow Pin Man onto the amp also displays StreetView showing the Pin at the location the Picture was taken,
Touching the pin takes you back to the Map View.
|
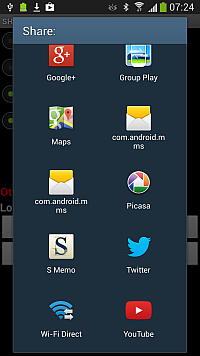
Sharing Your Pictures
|
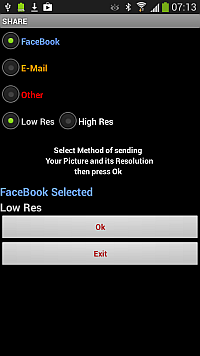
Your pictures can be shared in any screen the displays the Share Icon or has a button
diplaying Share.
|
|
|
|
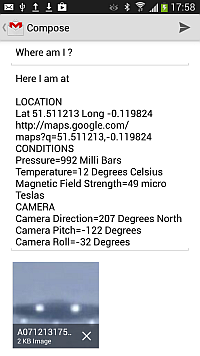
Your pictures can be shared using all of the methods shown above. You can chose between Low Res or High Res
picture sharing (.png or .jpg). The E-Mail option will also tranmmit the associated data for the Image, including a link
to Google maps to precisely display its location on Google Maps.
|
|
|
Buiding Your Own Database of Existing Sightings/Phenomena
|
If you wish, then you could use one of your Databases to assemble a list of
existing Ufo/Phenomenan sightings. To do this first obtian a picture of the sightinf and store it on your phone.
Then select Manual on your Map Screen and touch the area in the World that the sighting took place. This will place a pin at that location.
Touch the pin to display an empty window, then touch the window to take you to the pin edit screenn.
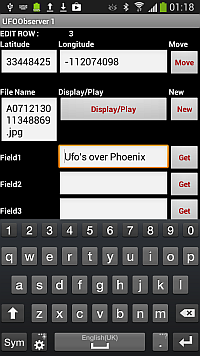
Here we are doing an example of he Phoenix Lights
|
|
|
Now press new and select your Phoenix lights picture form your gallery
and press save.
|
|
|
Your database now contains the location and pictures of the Phoenix lights
|
E-Mailing Your Selected Database To Computer
|
All the contents of your selected database can be E-Mailed to a PC (except Videos due to size)
for viewing using the STREETVIEW.html viewer included with the files E-Mailed. The E-Mail also includes
your Database in CSV format for integration into an existing Database or Excel Spreadsheet.
|
|
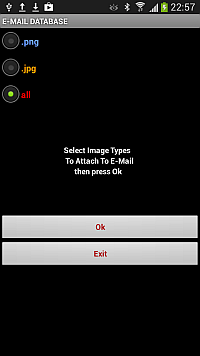
Select the E-Mail Database option from the List Screen menu,
Select "all" from the screen then press OK.
|
When the E-Mail is recieved, extract it into a folder then to view it
, run the STREETVIEW,html viewer in Internet Explorer (it will not run in other browsers).
The image abvove shows the first picture, pressing Next on the Mapview will display the subsequent pictures.
|
|
|
Associated recorded data and comments will also be shown in the image window.
|